Azure File Shares and Snapshots
Scott Duffy Lectures 17 & 18 AZ-104Overview
Azure File Shares provide fully managed network file shares in the cloud, accessible via the industry-standard SMB (Server Message Block) protocol. Unlike blob containers which use a flat namespace, Azure Files supports a true hierarchical directory structure with real folders and subfolders. File shares are accessible from both Windows and Linux, and support standard file operations including upload, download, copy, and directory management.
Exam Tip
When an exam question asks about file share recovery, think snapshots. Snapshots are incremental, low-cost, and stored in the same storage account. Backup policies through Azure Backup automate snapshot scheduling via Recovery Services Vault. Know that snapshots are read-only, point-in-time copies and that only changes after snapshot creation consume additional storage.
Azure Files Architecture
direction: down

title: {
  label: Azure Files Architecture
  near: top-center
  shape: text
  style.font-size: 24
  style.bold: true
}

sa: Azure Storage Account {
  style.fill: "#1a73e8"
  style.font-color: "#fff"
  shape: cylinder

  fs: File Share {
    style.fill: "#2563eb"
    style.font-color: "#fff"

    dir1: Directory A {
      style.fill: "#3b82f6"
      style.font-color: "#fff"
      f1: file1.txt
      f2: file2.pdf
    }

    dir2: Directory B {
      style.fill: "#3b82f6"
      style.font-color: "#fff"
      f3: report.docx
      f4: image.png
    }
  }

  snapshots: Snapshots {
    style.fill: "#7c3aed"
    style.font-color: "#fff"
    snap1: "Snapshot 1\n(point-in-time copy)"
    snap2: "Snapshot 2\n(incremental delta)"
  }
}

rsv: Recovery Services Vault {
  style.fill: "#dc2626"
  style.font-color: "#fff"
  shape: rectangle
  backup: "Azure Backup\n(automated snapshots)"
}

clients: Clients {
  style.fill: "#f5f5f5"
  win: "Windows\n(SMB mount)" {
    style.fill: "#0078d4"
    style.font-color: "#fff"
  }
  linux: "Linux\n(CIFS mount)" {
    style.fill: "#e95420"
    style.font-color: "#fff"
  }
  browser: "Storage Browser\n/ Storage Explorer" {
    style.fill: "#4CAF50"
    style.font-color: "#fff"
  }
}

sa.fs -> sa.snapshots: "point-in-time copies"
sa.snapshots -> rsv: "via Azure Backup"
clients.win -> sa.fs: "SMB (port 445)"
clients.linux -> sa.fs: "CIFS/SMB (port 445)"
clients.browser -> sa.fs: "HTTPS"
rsv.backup -> sa.snapshots: "scheduled snapshots"
Azure File Share (Lecture 17)
Azure Files exposes a network file share that behaves like a traditional on-premises file server. You can mount it as a drive letter on Windows or a mount point on Linux and interact with it using standard file system commands.
Key Characteristics
| Property | Details |
|---|---|
| Protocol | SMB (port 445), NFS (port 2049), REST API |
| Directory structure | Hierarchical -- real folders and subfolders |
| Mountable | Windows, Linux, macOS -- mounts as a native network drive |
| Max share size | 5 TiB default, 100 TiB with large file shares enabled (standard); 100 TiB provisioned (premium) |
| Max file size | 4 TiB |
| Max open handles per file | 2,000 |
| Max snapshots per share | 200 |
| Encryption | SMB 3.x encryption in transit, Azure Storage encryption at rest |
File Share Workflow
The standard workflow for working with Azure File Shares follows these steps:
- Create file share -- define name, quota, and tier within a storage account
- Create directories -- build out a hierarchical folder structure within the share
- Upload files -- add files to directories via portal, Storage Browser, Storage Explorer, or SMB mount
- Assign RBAC roles -- grant appropriate permissions to users and applications
- Access the share -- connect via SMB mount, Storage Browser, or Azure Storage Explorer
File Share Tiers
| Tier | Performance | Use Case | Protocol | Max Size |
|---|---|---|---|---|
| Premium | SSD-backed, low latency | Databases, IO-intensive workloads | SMB / NFS | 100 TiB |
| Transaction Optimized | HDD, general purpose | Default tier, mixed workloads | SMB | 100 TiB |
| Hot | HDD, optimized for access | Frequently accessed shares | SMB | 100 TiB |
| Cool | HDD, optimized for storage | Archival, infrequent access, backup | SMB | 100 TiB |
Tier Selection
Transaction Optimized is the default tier and suitable for most general-purpose workloads. Choose Premium only when you need SSD-backed, low-latency performance for IO-intensive applications like databases. Hot and Cool tiers optimize cost based on access frequency -- Cool tier has lower storage costs but higher transaction costs.
Screenshots
File Share Creation
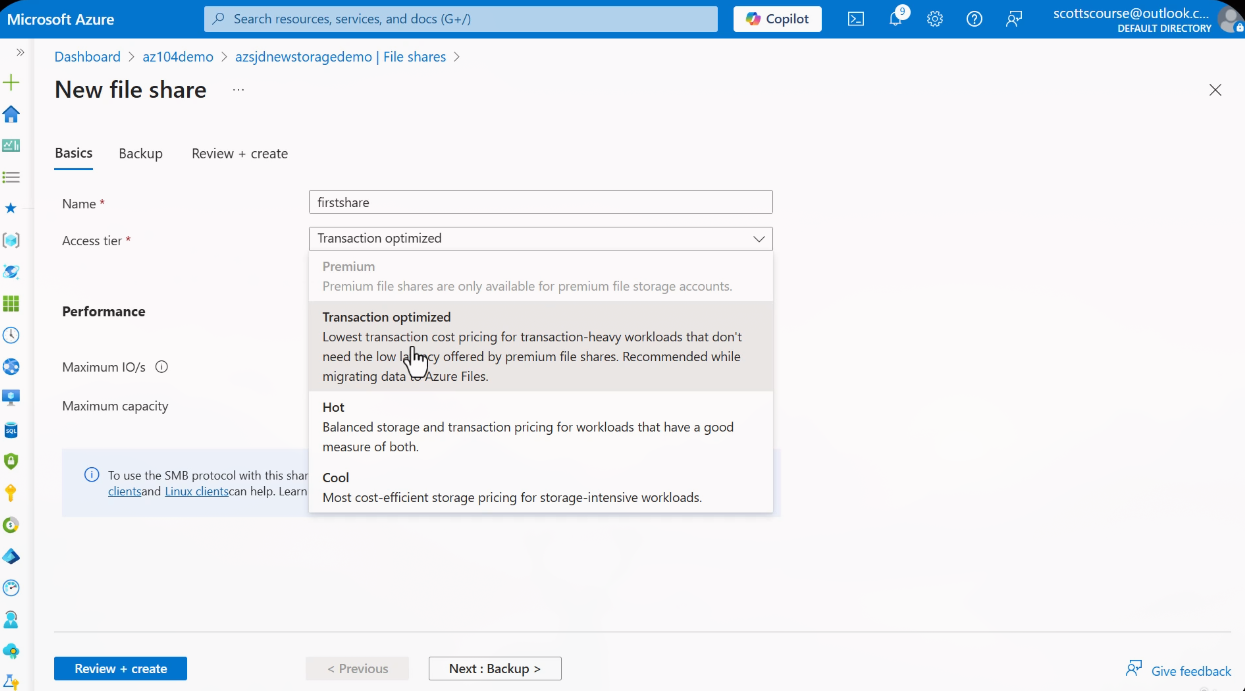
Navigate to your storage account > Data storage > File shares > + File share. Configure the share name, tier, and quota.
File Share Backup Configuration
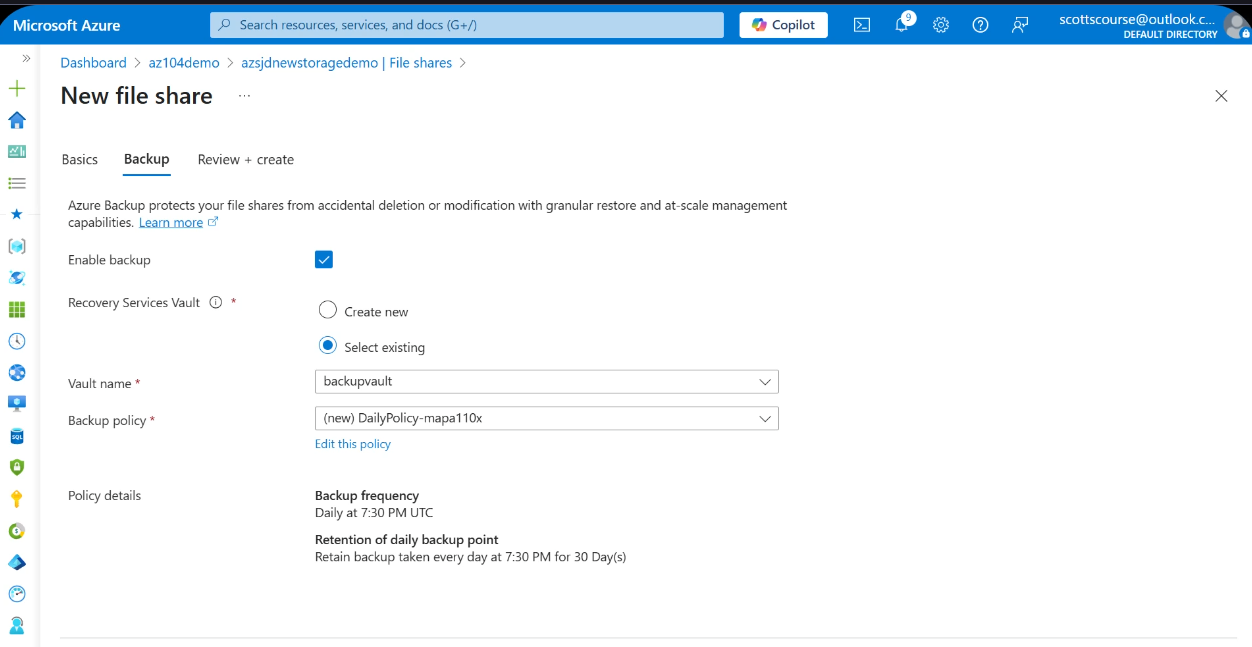
Configure backup for the file share via Operations > Backup. Select or create a Recovery Services Vault and define a backup policy with schedule and retention settings.
RBAC Roles for File Shares
Azure Files supports fine-grained RBAC roles that control access to file share data. These roles can be assigned at the storage account level (all shares) or at the individual resource level (specific share).
| Role | Permissions | Use Case |
|---|---|---|
| Storage File Data Privileged Contributor | Full read, write, and delete access to all file share data | Administrators needing complete file share management |
| Storage File Data SMB Share Contributor | Read, write, and delete access via SMB protocol | Standard users needing full SMB access |
| Storage File Data SMB Share Reader | Read-only access via SMB protocol | Users needing view-only access to share contents |
| Storage File Data SMB Share Elevated Contributor | Read, write, delete + modify NTFS ACLs | Administrators who need to manage Windows-style file permissions |
RBAC Assignment Scope
These roles can be assigned at two levels:
- Storage account level -- applies to all file shares in the account
- Resource level -- applies to a specific file share only
For least-privilege access, assign roles at the resource level whenever possible.
Identity-Based Authentication
Azure Files supports three identity-based authentication methods for SMB access:
| Method | Description | Scenario |
|---|---|---|
| On-premises AD DS | Join storage account to your on-premises Active Directory | Hybrid environments with existing AD infrastructure |
| Entra Domain Services | Use Azure AD Domain Services for authentication | Cloud-native environments with managed domain services |
| Entra Kerberos | Kerberos authentication for hybrid identities | Hybrid identities accessing file shares from Entra ID-joined devices |
INFO
Identity-based authentication allows users to access file shares using their existing domain credentials instead of storage account keys. This is the recommended approach for enterprise environments where you need per-user access control and audit trails.
Accessing File Shares
SMB Mount Commands
# Map network drive using net use
net use Z: \\mystorageaccount.file.core.windows.net\myshare /u:AZURE\mystorageaccount <storage-account-key>

# PowerShell -- Persistent mount that survives reboots
New-PSDrive -Name Z -PSProvider FileSystem `
  -Root "\\mystorageaccount.file.core.windows.net\myshare" `
  -Persist `
  -Credential (New-Object PSCredential(
    "AZURE\mystorageaccount",
    (ConvertTo-SecureString "<key>" -AsPlainText -Force)
))# Create mount point and mount with CIFS
sudo mkdir /mnt/myshare
sudo mount -t cifs \
//mystorageaccount.file.core.windows.net/myshare \
/mnt/myshare \
-o vers=3.0,username=mystorageaccount,password=<key>,dir_mode=0777,file_mode=0777,serverino
# Persistent mount via /etc/fstab
echo '//mystorageaccount.file.core.windows.net/myshare /mnt/myshare cifs nofail,vers=3.0,credentials=/etc/smbcredentials/mystorageaccount.cred,dir_mode=0777,file_mode=0777,serverino' \
| sudo tee -a /etc/fstabPort 445
SMB uses port 445. Many ISPs and corporate firewalls block this port. If you cannot connect to the file share from your local machine, verify that outbound port 445 is open. Azure VPN Gateway or ExpressRoute can be used to access file shares over a private connection.
Storage Browser and Storage Explorer
The Storage Browser (built into the Azure Portal) and Azure Storage Explorer (free downloadable desktop application for Windows, Mac, and Linux) provide GUI-based file management with additional features not available in the standard file share portal view:
- Copy and paste files between shares and containers
- Clone files within the storage browser
- Generate SAS tokens for individual files (requires key-based authentication to be enabled)
- Navigate hierarchical directory structure with breadcrumb navigation
File Share Snapshots (Lecture 18)
Snapshots are point-in-time, read-only versions of an Azure file share. They capture the exact state of every file and directory in the share at the moment the snapshot is created. Snapshots are the primary mechanism for file-level recovery in Azure Files.
Snapshot Characteristics
| Property | Details |
|---|---|
| Type | Read-only, point-in-time copy |
| Storage | Incremental -- only changes after snapshot consume additional storage |
| Location | Stored in the same storage account (not a separate account) |
| Creation | Manual or automated via Azure Backup policies |
| Retention | As long as needed (manual) or policy-defined (automated) |
| Limit | Maximum 200 snapshots per file share |
| Availability | General Purpose v2 accounts and Premium file shares only |
Not Available on Standard Blob Storage
File share snapshots are specific to Azure Files. They are not available on standard blob storage. Blob storage has its own versioning and soft delete mechanisms. Do not confuse file share snapshots with blob snapshots.
Snapshot Lifecycle
Snapshot Operations
| Operation | Description |
|---|---|
| Create snapshot | Manual operation -- captures current state of the entire file share |
| Browse snapshot contents | Navigate the snapshot as if it were the current version of the share |
| Restore file | Copy a specific file from the snapshot back to the active share as the current version |
| Restore entire snapshot | Promote a past snapshot version to become the current active share |
| Download file | Download a specific file version from the snapshot without restoring |
| List snapshots | View all available snapshots for the file share with timestamps |
Snapshot Storage Cost
Snapshots are stored incrementally in the same storage account:
- The first snapshot captures the full state of the share
- Subsequent snapshots store only the delta (changes since the last snapshot)
- No separate storage account is needed
- You pay only for the storage consumed by snapshot deltas
- Deleting intermediate snapshots does not free space for data still referenced by later snapshots
Cost Optimization
Because snapshots are incremental, the cost of maintaining multiple snapshots is significantly lower than maintaining full copies. A daily snapshot policy with 30-day retention is a cost-effective recovery strategy for most workloads.
Recovery Workflow
When a file is corrupted, accidentally modified, or deleted, you can recover it from a snapshot:
- Browse to the desired snapshot in the file share > Snapshots section
- Navigate the snapshot directory structure to locate the file
- Click restore -- this copies the file from the snapshot to the active share, replacing the current version
- Alternatively -- download the specific version from the snapshot without overwriting the current file
Recovery Sequence
Previous Versions Support
Windows operating systems provide built-in support for viewing Previous Versions of files stored on Azure File Shares, built on top of the snapshot infrastructure.
How It Works
- Mount the Azure file share as a network drive on Windows
- Right-click a file or folder and select Properties
- Navigate to the Previous Versions tab
- View all available versions based on existing snapshots
- Select a version to restore or open for comparison
INFO
The Previous Versions tab provides a user-friendly interface for file recovery without requiring access to the Azure Portal. End users can self-service recover their own files if the share is mounted and snapshots exist.
Azure Backup Integration
Azure Backup creates file share snapshots automatically via Recovery Services Vault. This provides scheduled, policy-driven snapshot management without manual intervention.
Backup Policy Flow
Backup Policy Example
| Setting | Value |
|---|---|
| Schedule | Daily at 7:30 UTC |
| Retention | 30 days |
| Action | Automatically snapshot any changed files in the share |
| Storage | Snapshots stored in the same storage account, managed by Recovery Services Vault |
TIP
The Recovery Services Vault does not store a separate copy of the data. It manages and orchestrates the snapshot lifecycle. The actual snapshot data resides within the same storage account as the file share.
Snapshot vs Manual Creation
Both manual and automated snapshots appear in the same snapshot list on the file share and use the same incremental storage mechanism.
| Aspect | Manual Snapshots | Automated Backups |
|---|---|---|
| Creation | On-demand via portal, CLI, or script | Policy-driven via Azure Backup |
| Naming | User-defined (e.g., "previousversions") | Policy-named (e.g., "AzureBackup_...") |
| Schedule | Ad-hoc | Defined in backup policy (e.g., daily) |
| Retention | Until manually deleted | Policy-defined (e.g., 30 days) |
| Management | Manual cleanup required | Automatic expiration per policy |
| Storage | Incremental, same account | Incremental, same account |
| Visibility | Appears in file share > Snapshots | Appears in file share > Snapshots AND Recovery Services Vault |
Azure File Sync
John SavillAzure File Sync extends Azure Files to on-premises Windows Servers, enabling hybrid file share scenarios with centralized cloud management. It allows organizations to cache frequently accessed files on local servers while maintaining a complete copy of the data in Azure.
Architecture
direction: down

title: {
  label: Azure File Sync Architecture
  near: top-center
  shape: text
  style.font-size: 24
  style.bold: true
}

sss: Storage Sync Service {
  style.fill: "#1a73e8"
  style.font-color: "#fff"

  sg: Sync Group {
    style.fill: "#2563eb"
    style.font-color: "#fff"

    ce: "Cloud Endpoint\n(Azure File Share)\n-- exactly 1 per sync group --" {
      style.fill: "#7c3aed"
      style.font-color: "#fff"
    }

    se1: "Server Endpoint 1\nD:\\Data on Server A" {
      style.fill: "#16a34a"
      style.font-color: "#fff"
    }

    se2: "Server Endpoint 2\nE:\\Shared on Server B" {
      style.fill: "#16a34a"
      style.font-color: "#fff"
    }

    se3: "Server Endpoint N\n(up to 100 per sync group)" {
      style.fill: "#16a34a"
      style.font-color: "#fff"
    }
  }
}

azure_share: "Azure File Share\n(cloud storage)" {
  style.fill: "#0078d4"
  style.font-color: "#fff"
  shape: cylinder
}

server_a: "Windows Server A\n(File Sync Agent)" {
  style.fill: "#0078d4"
  style.font-color: "#fff"
}

server_b: "Windows Server B\n(File Sync Agent)" {
  style.fill: "#0078d4"
  style.font-color: "#fff"
}

sss.sg.ce <-> azure_share: "bi-directional sync"
sss.sg.se1 <-> server_a: "bi-directional sync"
sss.sg.se2 <-> server_b: "bi-directional sync"
server_a <-> azure_share: "sync via cloud endpoint"
server_b <-> azure_share: "sync via cloud endpoint"
Components
| Component | Description | Limits |
|---|---|---|
| Storage Sync Service | Top-level Azure resource that manages sync relationships | One per deployment |
| Sync Group | Defines which endpoints sync together | Multiple per Sync Service |
| Cloud Endpoint | The Azure file share (one per sync group) | Exactly 1 per sync group |
| Registered Server | On-prem Windows Server with agent installed | Agent required |
| Server Endpoint | A specific path on a registered server | Up to 100 per sync group |
Agent Installation and Registration
The Azure File Sync agent must be installed on every Windows Server that participates in sync. The process follows these steps:
- Download the agent -- obtain the Azure File Sync agent from the Microsoft Download Center
- Install the agent -- run the installer on the Windows Server (requires Windows Server 2016 or later)
- Register with Storage Sync Service -- during installation, sign in to Azure and select the Storage Sync Service resource to register the server
- Create server endpoints -- after registration, create server endpoints in a sync group by specifying local paths on the registered server that should participate in sync
INFO
The agent automatically keeps itself up to date via the Microsoft Update service. Ensure that the server has outbound HTTPS (port 443) connectivity to Azure for sync operations.
Cloud Tiering
Cloud tiering is an optional feature of Azure File Sync that replaces infrequently accessed files with lightweight placeholders (reparse points) on the local server. When a user or application opens a tiered file, it is transparently recalled from the Azure file share without the user needing to know the file is stored in Azure.
Cloud tiering is configured per server endpoint -- you can enable it on some endpoints and disable it on others within the same sync group.
Tiering Policies
| Policy | How It Works | Use Case |
|---|---|---|
| Volume Free Space | Maintain X% free space on the volume -- tier oldest files first when threshold is reached | Prevent local disk from filling up |
| Date Policy | Tier files not accessed within X days | Keep recent files local, archive older files to Azure |
TIP
Both policies can be enabled simultaneously -- whichever triggers first wins. For example, you might set Volume Free Space to 20% AND Date Policy to 30 days. If either condition is met, the file gets tiered to Azure.
Cloud Tiering Workflow
Change Detection and Sync Behavior
How quickly changes propagate depends on where the change originates:
| Change Origin | Detection Method | Latency |
|---|---|---|
| Server endpoint (local change) | USN journal (Windows) | Near-instant |
| Cloud endpoint (Azure portal/API) | Change detection job | Up to 24 hours |
Exam Tip
Changes made directly to the Azure file share (via the portal, REST API, or SMB mount to the cloud share) are NOT detected instantly. The change detection job runs approximately every 24 hours. Server-side changes are near-instant via the Windows USN journal.
DANGER
Azure File Sync is NOT designed for simultaneous writes from multiple endpoints to the same file. Concurrent modifications from different servers to the same file will result in sync conflicts. Design your folder structure so that different servers write to different directories.
Sync Conflict Resolution
When the same file is modified on multiple endpoints before sync completes, Azure File Sync resolves the conflict as follows:
- The most recent write keeps the original filename
- The older version gets the endpoint name appended:
<filename>-<endpointName>[-#].<ext> - A maximum of 100 conflict files are retained per original file
- Files sync bi-directionally across all endpoints in the sync group -- every server endpoint eventually receives all versions
CLI Reference
# Create a Storage Sync Service (if not already created)
New-AzStorageSyncService `
  -ResourceGroupName "myRG" `
  -Name "mySyncService" `
  -Location "eastus"

# Create a Sync Group
New-AzStorageSyncGroup `
  -ResourceGroupName "myRG" `
  -StorageSyncServiceName "mySyncService" `
-Name "mySyncGroup"# Create a Cloud Endpoint (link to Azure File Share)
New-AzStorageSyncCloudEndpoint `
-ResourceGroupName "myRG" `
-StorageSyncServiceName "mySyncService" `
-SyncGroupName "mySyncGroup" `
-Name "myCloudEndpoint" `
-StorageAccountResourceId "/subscriptions/<sub-id>/resourceGroups/myRG/providers/Microsoft.Storage/storageAccounts/myaccount" `
-AzureFileShareName "myshare"# Create a Server Endpoint with cloud tiering enabled
New-AzStorageSyncServerEndpoint `
-ResourceGroupName "myRG" `
-StorageSyncServiceName "mySyncService" `
-SyncGroupName "mySyncGroup" `
-Name "myServerEndpoint" `
-ServerResourceId "/subscriptions/<sub-id>/resourceGroups/myRG/providers/Microsoft.StorageSync/storageSyncServices/mySyncService/registeredServers/<server-id>" `
-ServerLocalPath "D:\SyncFolder" `
-CloudTiering `
-VolumeFreeSpacePercent 20File Share Limits
| Limit | Standard | Premium |
|---|---|---|
| Share size (default) | 5 TiB | 100 TiB (provisioned) |
| Share size (large file shares enabled) | 100 TiB | 100 TiB |
| Maximum file size | 4 TiB | 4 TiB |
| Maximum open handles per file | 2,000 | 2,000 |
| Maximum snapshots per share | 200 | 200 |
| Maximum number of shares per account | No hard limit | No hard limit |
CLI Reference
File Share Management
# Create a file share
az storage share-rm create \
  --resource-group myRG \
  --storage-account myaccount \
  --name myshare \
  --quota 100 \
  --access-tier "TransactionOptimized"

# List file shares
az storage share-rm list \
  --resource-group myRG \
  --storage-account myaccount \
  --output table

# Create a directory in the share
az storage directory create \
  --name mydir \
  --share-name myshare \
  --account-name myaccount

# Upload a file to the share
az storage file upload \
  --share-name myshare \
  --source ./myfile.txt \
  --path mydir/myfile.txt \
  --account-name myaccount

# List files in a share
az storage file list \
  --share-name myshare \
  --account-name myaccount \
  --output table

# Download a file from the share
az storage file download \
  --share-name myshare \
  --path mydir/myfile.txt \
  --dest ./downloaded.txt \
  --account-name myaccount

# Delete a file share
az storage share-rm delete \
  --resource-group myRG \
  --storage-account myaccount \
--name myshare# Create storage context
$ctx = New-AzStorageContext `
-StorageAccountName "myaccount" `
-StorageAccountKey "<key>"
# Create a file share
New-AzRmStorageShare `
-ResourceGroupName "myRG" `
-StorageAccountName "myaccount" `
-Name "myshare" `
-QuotaGiB 100 `
-AccessTier "TransactionOptimized"
# List file shares
Get-AzRmStorageShare `
-ResourceGroupName "myRG" `
-StorageAccountName "myaccount"
# Create a directory in the share
New-AzStorageDirectory `
-ShareName "myshare" `
-Path "mydir" `
-Context $ctx
# Upload a file to the share
Set-AzStorageFileContent `
-ShareName "myshare" `
-Source "./myfile.txt" `
-Path "mydir/myfile.txt" `
-Context $ctx
# List files in a share
Get-AzStorageFile -ShareName "myshare" -Context $ctx
# Download a file from the share
Get-AzStorageFileContent `
-ShareName "myshare" `
-Path "mydir/myfile.txt" `
-Destination "./downloaded.txt" `
-Context $ctx
# Delete a file share
Remove-AzRmStorageShare `
-ResourceGroupName "myRG" `
-StorageAccountName "myaccount" `
-Name "myshare"Snapshot Management
# Create a file share snapshot
az storage share snapshot \
  --name myshare \
  --account-name myaccount

# List snapshots for a file share
az storage share list \
  --account-name myaccount \
  --include-snapshots \
  --query "[?snapshotTime!=null]" \
  --output table

# Download a file from a specific snapshot
az storage file download \
  --share-name myshare \
  --path mydir/myfile.txt \
  --dest ./restored.txt \
  --account-name myaccount \
  --snapshot "2026-02-01T20:50:00.0000000Z"

# Delete a specific snapshot
az storage share delete \
  --name myshare \
  --account-name myaccount \
--snapshot "2026-02-01T20:50:00.0000000Z"$ctx = New-AzStorageContext `
-StorageAccountName "myaccount" `
-StorageAccountKey "<key>"
# Create a file share snapshot
$snapshot = Get-AzStorageShare -Name "myshare" -Context $ctx |
New-AzStorageShareSnapshot
# List snapshots for a file share
Get-AzStorageShare -Name "myshare" -Context $ctx -SnapshotTime $null |
Where-Object { $_.SnapshotTime -ne $null }
# Download a file from a specific snapshot
Get-AzStorageFileContent `
-ShareName "myshare" `
-Path "mydir/myfile.txt" `
-Destination "./restored.txt" `
-Context $ctx `
-SnapshotTime $snapshot.SnapshotTime
# Delete a specific snapshot
Remove-AzStorageShare `
-Name "myshare" `
-Context $ctx `
-SnapshotTime $snapshot.SnapshotTimeBackup Configuration
# Create a Recovery Services Vault
az backup vault create \
  --resource-group myRG \
  --name myVault \
  --location eastus

# Enable backup for a file share
az backup protection enable-for-azurefileshare \
  --resource-group myRG \
  --vault-name myVault \
  --storage-account myaccount \
  --azure-file-share myshare \
  --policy-name DailyPolicy

# List backup policies
az backup policy list \
  --resource-group myRG \
  --vault-name myVault \
  --output table

# Trigger an on-demand backup
az backup protection backup-now \
  --resource-group myRG \
  --vault-name myVault \
  --container-name "StorageContainer;storage;myRG;myaccount" \
  --item-name "AzureFileShare;myshare" \
  --retain-until 2026-03-01

# List recovery points (snapshots managed by backup)
az backup recoverypoint list \
  --resource-group myRG \
  --vault-name myVault \
  --container-name "StorageContainer;storage;myRG;myaccount" \
  --item-name "AzureFileShare;myshare" \
--output table# Create a Recovery Services Vault
New-AzRecoveryServicesVault `
-ResourceGroupName "myRG" `
-Name "myVault" `
-Location "eastus"
# Set vault context
$vault = Get-AzRecoveryServicesVault `
-ResourceGroupName "myRG" `
-Name "myVault"
Set-AzRecoveryServicesVaultContext -Vault $vault
# Get the default backup policy for Azure Files
$policy = Get-AzRecoveryServicesBackupProtectionPolicy `
-WorkloadType "AzureFiles"
# Enable backup for a file share
$sa = Get-AzStorageAccount `
-ResourceGroupName "myRG" `
-Name "myaccount"
Enable-AzRecoveryServicesBackupProtection `
-StorageAccountName $sa.StorageAccountName `
-Name "myshare" `
-Policy $policy
# Trigger an on-demand backup
$container = Get-AzRecoveryServicesBackupContainer `
-ContainerType "AzureStorage" `
-FriendlyName "myaccount"
$item = Get-AzRecoveryServicesBackupItem `
-Container $container `
-WorkloadType "AzureFiles" `
-Name "myshare"
Backup-AzRecoveryServicesBackupItem -Item $item
# List recovery points
Get-AzRecoveryServicesBackupRecoveryPoint -Item $itemRBAC Role Assignment
# Assign Storage File Data Privileged Contributor
az role assignment create \
  --role "Storage File Data Privileged Contributor" \
  --assignee user@domain.com \
  --scope /subscriptions/<sub-id>/resourceGroups/<rg>/providers/Microsoft.Storage/storageAccounts/<account>

# Assign SMB Share Contributor at file share level
az role assignment create \
  --role "Storage File Data SMB Share Contributor" \
  --assignee user@domain.com \
  --scope /subscriptions/<sub-id>/resourceGroups/<rg>/providers/Microsoft.Storage/storageAccounts/<account>/fileServices/default/fileshares/<share-name>

# Assign SMB Share Reader
az role assignment create \
  --role "Storage File Data SMB Share Reader" \
  --assignee reader@domain.com \
  --scope /subscriptions/<sub-id>/resourceGroups/<rg>/providers/Microsoft.Storage/storageAccounts/<account>/fileServices/default/fileshares/<share-name>

# List role assignments on a storage account
az role assignment list \
  --scope /subscriptions/<sub-id>/resourceGroups/<rg>/providers/Microsoft.Storage/storageAccounts/<account> \
--output table# Assign Storage File Data Privileged Contributor
New-AzRoleAssignment `
-SignInName "user@domain.com" `
-RoleDefinitionName "Storage File Data Privileged Contributor" `
-Scope "/subscriptions/<sub-id>/resourceGroups/<rg>/providers/Microsoft.Storage/storageAccounts/<account>"
# Assign SMB Share Contributor at file share level
New-AzRoleAssignment `
-SignInName "user@domain.com" `
-RoleDefinitionName "Storage File Data SMB Share Contributor" `
-Scope "/subscriptions/<sub-id>/resourceGroups/<rg>/providers/Microsoft.Storage/storageAccounts/<account>/fileServices/default/fileshares/<share-name>"
# Assign SMB Share Reader
New-AzRoleAssignment `
-SignInName "reader@domain.com" `
-RoleDefinitionName "Storage File Data SMB Share Reader" `
-Scope "/subscriptions/<sub-id>/resourceGroups/<rg>/providers/Microsoft.Storage/storageAccounts/<account>/fileServices/default/fileshares/<share-name>"
# List role assignments
Get-AzRoleAssignment `
-Scope "/subscriptions/<sub-id>/resourceGroups/<rg>/providers/Microsoft.Storage/storageAccounts/<account>"Lab: Azure File Shares and Snapshots
Lab Objectives
Practice creating file shares, managing directories and files, working with snapshots for point-in-time recovery, and configuring automated backups via Recovery Services Vault.
Step 1 -- Create a file share named "labshare" with Transaction Optimized tier
# Set variables
RG="az104-storage-lab"
ACCOUNT="<your-storage-account>"
SHARE="labshare"

# Create the file share with Transaction Optimized tier
az storage share-rm create \
  --resource-group $RG \
  --storage-account $ACCOUNT \
  --name $SHARE \
  --quota 10 \
  --access-tier "TransactionOptimized"

# Verify creation
az storage share-rm show \
  --resource-group $RG \
  --storage-account $ACCOUNT \
  --name $SHARE \
  --output table
Step 2 -- Create directories (docs, images, backups) and upload files
# Create directories
az storage directory create --name docs --share-name $SHARE --account-name $ACCOUNT
az storage directory create --name images --share-name $SHARE --account-name $ACCOUNT
az storage directory create --name backups --share-name $SHARE --account-name $ACCOUNT

# Create sample files
echo "This is a test document for the file share lab." > /tmp/readme.txt
echo "Configuration settings: debug=true, level=info" > /tmp/config.txt
echo "Backup manifest: created $(date -u)" > /tmp/manifest.txt

# Upload files to respective directories
az storage file upload --share-name $SHARE --source /tmp/readme.txt --path docs/readme.txt --account-name $ACCOUNT
az storage file upload --share-name $SHARE --source /tmp/config.txt --path docs/config.txt --account-name $ACCOUNT
az storage file upload --share-name $SHARE --source /tmp/manifest.txt --path backups/manifest.txt --account-name $ACCOUNT

# List files to verify
az storage file list --share-name $SHARE --path docs --account-name $ACCOUNT --output table
az storage file list --share-name $SHARE --path backups --account-name $ACCOUNT --output table
Step 3 -- Mount the file share on your local machine via SMB
# Get the storage account key
KEY=$(az storage account keys list --resource-group $RG --account-name $ACCOUNT --query "[0].value" -o tsv)

# Linux -- Mount with CIFS
sudo mkdir -p /mnt/labshare
sudo mount -t cifs \
  //$ACCOUNT.file.core.windows.net/$SHARE \
  /mnt/labshare \
  -o vers=3.0,username=$ACCOUNT,password=$KEY,dir_mode=0777,file_mode=0777,serverino

# Verify mount
ls -la /mnt/labshare/
ls -la /mnt/labshare/docs/

# Windows (run in PowerShell as Administrator)
# net use Z: \\<account>.file.core.windows.net\labshare /u:AZURE\<account> <key>
Step 4 -- Take a manual snapshot
# Create a snapshot
SNAPSHOT=$(az storage share snapshot \
  --name $SHARE \
  --account-name $ACCOUNT \
  --query "snapshot" -o tsv)

echo "Snapshot created: $SNAPSHOT"

# List snapshots to verify
az storage share list \
  --account-name $ACCOUNT \
  --include-snapshots \
  --query "[?name=='$SHARE' && snapshotTime!=null]" \
  --output table
Step 5 -- Modify a file in the share
# Overwrite the readme.txt with new content
echo "MODIFIED: This file has been changed after the snapshot was taken." > /tmp/readme-modified.txt

az storage file upload \
  --share-name $SHARE \
  --source /tmp/readme-modified.txt \
  --path docs/readme.txt \
  --account-name $ACCOUNT

# Verify the file was modified
az storage file download \
  --share-name $SHARE \
  --path docs/readme.txt \
  --dest /tmp/readme-current.txt \
  --account-name $ACCOUNT --no-progress
cat /tmp/readme-current.txt
# Should show: MODIFIED: This file has been changed...
Step 6 -- Restore the original file from the snapshot
# Download the original file from the snapshot
az storage file download \
  --share-name $SHARE \
  --path docs/readme.txt \
  --dest /tmp/readme-restored.txt \
  --account-name $ACCOUNT \
  --snapshot "$SNAPSHOT" --no-progress

# Verify the restored content
cat /tmp/readme-restored.txt
# Should show: This is a test document for the file share lab.

# Upload the restored version back to the active share
az storage file upload \
  --share-name $SHARE \
  --source /tmp/readme-restored.txt \
  --path docs/readme.txt \
  --account-name $ACCOUNT

# Verify restoration
az storage file download \
  --share-name $SHARE \
  --path docs/readme.txt \
  --dest /tmp/readme-verify.txt \
  --account-name $ACCOUNT --no-progress
cat /tmp/readme-verify.txt
# Should show original content
Step 7 -- Configure a backup policy with Recovery Services Vault (daily, 30-day retention)
# Create a Recovery Services Vault (if one does not already exist)
az backup vault create \
  --resource-group $RG \
  --name "labVault" \
  --location eastus

# Enable backup for the file share with default daily policy
az backup protection enable-for-azurefileshare \
  --resource-group $RG \
  --vault-name "labVault" \
  --storage-account $ACCOUNT \
  --azure-file-share $SHARE \
  --policy-name "DefaultPolicy"

# Verify backup is configured
az backup item list \
  --resource-group $RG \
  --vault-name "labVault" \
  --output table

# Trigger an on-demand backup to test
az backup protection backup-now \
  --resource-group $RG \
  --vault-name "labVault" \
  --container-name "StorageContainer;storage;$RG;$ACCOUNT" \
  --item-name "AzureFileShare;$SHARE" \
  --retain-until $(date -u -d "+30 days" '+%d-%m-%Y')
Step 8 -- Browse the Previous Versions tab on Windows (if using Windows)
If you have the file share mounted as a Windows network drive:
- Open File Explorer and navigate to the mounted drive (e.g.,
Z:\) - Navigate to the
docsfolder - Right-click on
readme.txtand select Properties - Click the Previous Versions tab
- You should see the snapshot version listed with its timestamp
- Select the previous version and click Restore to replace the current file, or Open to view it
This demonstrates the Windows OS integration with Azure File Share snapshots, providing a familiar file recovery experience for end users.
Lab Cleanup
# Unmount the file share (Linux)
sudo umount /mnt/labshare

# Delete the snapshot
az storage share delete \
  --name $SHARE \
  --account-name $ACCOUNT \
  --snapshot "$SNAPSHOT"

# Disable backup protection and delete backup data
az backup protection disable \
  --resource-group $RG \
  --vault-name "labVault" \
  --container-name "StorageContainer;storage;$RG;$ACCOUNT" \
  --item-name "AzureFileShare;$SHARE" \
  --delete-backup-data true --yes

# Delete the Recovery Services Vault
az backup vault delete \
  --resource-group $RG \
  --name "labVault" --yes

# Delete the file share
az storage share-rm delete \
  --resource-group $RG \
  --storage-account $ACCOUNT \
  --name $SHARE